It's hard to believe that we have reached the final quilting class! The quilt top is complete! I love it. When I began the process of picking out fabric, I picked three with green and thought that overall my blocks would look green. They definitely don’t. I guess I should have put the green fabric in the larger squares. I like the way it turned out though. It’s a good Fall/Autumn quilt.
For our final class, we learned how to put our backing together and how to baste the quilt. Our teacher also showed us how to bind the quilts when we get to that point. I had good practice piecing my back because my backing fabric was directional and so I had to line everything up when piecing it together.
After piecing, we learned how to cut out the batting and how to baste the quilt. One thing I learned about basting - it takes LOTS of pins! We worked as a group and got two of our quilts basted. I felt bad for the other woman because she was going to have to baste her quilt on her own at home because we ran out of time. Now I just have to get a walking foot in order to quilt it. I hope to get it finished in the next couple of weeks!

Wednesday, December 8, 2010
Dressing up the guest room
I had my quilting fabric lying on the guest bed and realized it was a perfect match! I hadn’t planned for the quilt to match anything in my house. I just picked out fabric that I thought was pretty. Since it does match, I decided to finally dress up the guest room. I added a matching throw pillow and I have plans to make matching curtains. I just need to run out and get more fabric!
Second Quilting Class
Well, you know how I was saying that pressing your blocks are crucial? It turns out I didn’t press correctly  I got to class and the teacher said my blocks looked great, but as we started squaring them up she realized that I didn’t press them quite right.
Last week, she told us to set the seam and then to open up our pieces with our fingers but not to open them up too much or we would pull the seams. I guess I was afraid of pulling the seams and didn’t quite open them up enough. So before I could square up my blocks, I had to go back to the iron and press my blocks. Of course, all 24 blocks are already sewn together and not pressed correctly, and therefore when I pressed them after the fact the seams aren’t quite right. Oh well, at least I learned from my mistake. I hope you won’t be able to tell too much when the quilt is complete.
Since I had to press all 24 of my blocks over again I was behind schedule in relation to the two other girls in the class. I hate being behind! I only squared up enough blocks for two rows so that I could arrange my blocks and sew two rows together and will have to do the rest at home. After we sewed our two rows together (one girl sewed all of her blocks together!), we learned how to cut out and sew on our borders. Our homework for this week is to finish out quilt top! I can’t wait to see it finished!
First Quilting Class
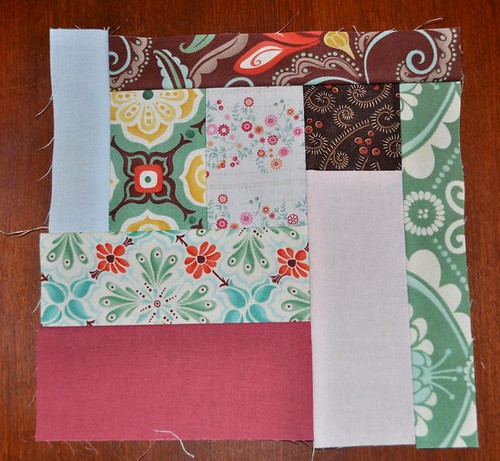
I’ve been busy this week with my homework from my first class. I can already tell I’m hooked! We learned about picking out our light, medium, and dark fabric, and the scale of the fabric. I’m a bit worried that my quilt will have too many fabrics with a large scale, but I guess you have to learn as you go. We are following the “Century of Progress” pattern which is from the 1933 quilt competition sponsored by Sears at the World Fair. Our homework this week includes, cutting our fabric and sewing 24 blocks.
The picture above is my first block. Some of the seams aren't very straight, but I learned as I went and got a little better each time.
Things I’ve learned from this project:
*when cutting with a rotary cutter, a table that is at the correct height is crucial if you don’t want back pain!
*Placing sandpaper circles on your rotary ruler helps it from sliding when cutting
*Pressing your blocks are crucial (Pressing and ironing are different)
*A beginner quilter will need to square up the blocks after piecing!
*Chain stitching speeds up the piecing process
Overall, it's been a fun first experience. I went into this project realizing that it's a skill that needs to be developed, and that my first project won't be perfect. It will be fun to look back over the next few years and see how my skills have improved.
My first sewing project
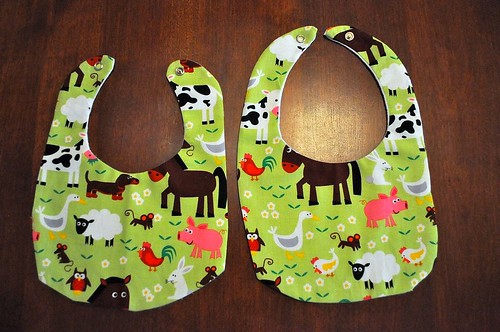
I recently found out one of my friends is having a baby. I thought an easy fun project would be to make bibs. I searched the web and found this cute site. There are also many other fun tutorials on the right toolbar. I found the cutest barnyard animal fabric from Hancock’s and started my first project. It was super easy! I have some practice to do in order to sew a straight line, but overall, I was happy with my first project. It was my first time applying snaps. Putting on snaps was a lot easier than I thought. What was your first sewing project?
Tuesday, December 7, 2010
Quilting Class
I’ve signed up to take a quilting class! I was researching sewing classes and came across this cute quilt shop right around the corner from my house! The sewing classes weren’t working with my schedule so I decided to learn to quilt. I’m excited! I’ve always wanted to learn, and this is the perfect opportunity. I’ll keep you updated on my progress!
My first piece of clothing!
I sewed my first piece of clothing! It’s nothing fancy - just an A-line skirt, but it was fun to do. The pattern said that it was an easy 2 hour project - - – It took me all day! Oh well. Everything went smoothly until I got to the waistband step. The instructions weren’t very clear so I just made something up. There was supposed to be a button and zipper closure in the back, but I settled for a zipper and a snap since it was taking me so long. I followed a great tutorial by grosgrain when sewing in the zipper and had no problems.
Firsts for me:
Firsts for me:
- following a pattern – includes buying enough fabric, getting my notions, cutting out the pattern, and following instructions
- sewing a zipper
- sewing darts
A New Endevour
I’ve had my grandmother’s sewing machine for 4 1/2 years. It’s a cute 70′s model Singer that sits in a table. For the past 4 1/2 years, I’ve used it as just that – a table. A table to place my keys on when I come in the door. I recently got married in May, and for my wedding, I decided that I could make the ring bearers’ pillows. Yes, I had two ring bearers – my cute twin nephews. Little did I know that this little project would spark an interest into sewing. Maybe it’s the whole being married thing. I have always wanted to sew, especially when I reached the stage of raising children. I guess getting married lit the spark to finally learning. Therefore, I’m starting this blog. Please join me as I document my progress in sewing, quilting and other fun crafts!
Subscribe to:
Posts (Atom)